
Recovering the C4 ECM/PCM Codes
The following applies to recovering the OBD-I (On Board Diagnostics) codes on the 1984 through 1993 model C4 Corvettes via the 12 pin ALDL connector located under the dash just to the right of the steering column.
1994 and 1995 C4s also had the OBD-I system but used a 16 pin access connector that would become standard for the OBD-II system used on 1996 and later Corvettes. For 1994 and later models, you will need to recover the codes using a special procedure involving the speedometer and the odometer as explained in the service manual or use a special diagnostic device known as a scan tool.
On Board Diagnostics
The 1984 through 1996 Corvette has an On Board Diagnostic (OBD) system which is part of the Electronic Control Module or ECM, (also known as Powertrain Control Module or PCM in 1994 and later Corvettes), plus a system of sensors located throughout the automobile. The ECM/PCM gathers input from the sensors and continuously changes the fuel/air mixture, timing and other engine and transmission parameters so as to optimize the operation of the automobile for the best compromise between performance, efficiency and exhaust emissions.
Any time a sensor's output exceeds a Hi/Lo reference parameter stored in a Programmable Read Only Memory (PROM) array in the ECM/PCM module, an error code is set and retained in the ECM/PCM memory.
This event causes the lighting of the Malfunction Indicator Lamp (MIL) on the "tell tale" panel (more commonly known as the "Check Engine" light) or the SYS (System) lamp located on the instrument panel above the speedometer on later C4 automobiles .
If the problem clears and remains cleared for 10 seconds, the light will extinguish however, the error code is still stored in the ECM/PCM memory.
Regardless of whether the problem is constant or intermittent, the error code can be recovered through a user friendly system involving the MIL (Check Engine) or SYS lamp.
To the immediate right of the steering column under the dash, you will find a multiple pin electrical connector. This connector is called the Assembly Line Data Link (ALDL).
From 1984 until the end of the 1993 model year a 12 pin ALDL was used. After that, a 16 pin ALDL connector was used. The 1994 and 1995 model year still used the OBD-I system even though they have 16 pin connectors. The 16 pin connector in the 1996 C4 is used for the much more complex OBD-II system and a scan tool is required to discover the OBD-II system's secrets.
The early ALDL connector has room for 12 pins however only 7 are populated and of those we are only interested in Pin "A" and "B" for this procedure.
Remove the ALDL cover (in the unlikely event that there still is one in the automobile...they usually were lost early in the automobile's lifetime) and as you view the pins, you will find the top row fully populated whereas not all are populated pin on the bottom row.
On the top row (as you view the connector from the cockpit), the pin designators are F,E,D,C,B,A.
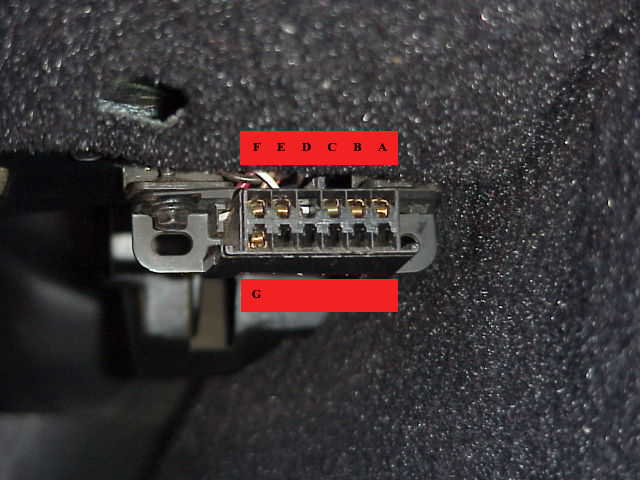
Here is a typical 12 pin connector. (Some have more pins on the lower row than this example).
The pins you are interested in are those two pins in the top, right hand portion of the connector, designated pins "A" and "B".
Pin "B" is the diagnostic enable pin and pin "A" is ground. By grounding pin "B", you enable the diagnostic readout functionality of the ECM/PCM.
Recovering Trouble Codes
To recover the codes, it is necessary that you short pins "A" and "B" together using a small section of electrical wire. Alternatively, you can cut up a paper clip and fashion it into a shorting device.
Regardless of your method, you will want to utilize something that will reliably make contact with the two pins but will not damage the connector or the pins.
With the ignition turned Off, short pins "A" and "B" on the ALDL using your previously prepared pin shorting device.
Turn on the ignition but Do Not start the automobile.
Within a few seconds, your "Check Engine" light (early C4s) or "SYS" light (later C4s) will flash a code of 12. There will be a single flash followed by two flashes and this will repeat three times: Flash (pause) Flash Flash (long pause), Flash (pause) Flash Flash (long pause), Flash (pause) Flash Flash (long pause).
Code 12 is a delimiter or marker code to show where the error code string begins and ends.
After the three code 12 flashes, you will either get an error code (or codes) or you will get another string of code 12 flashes if there are no trouble codes stored.
All codes are repeated three times with a long pause between each code group so (for instance) you could recover a string like this: 12, 12, 12, 36, 36, 36, 44, 44, 44, 12, 12, 12.
In this example, your OBD has stored error codes indicating that the Mass Air Flow burn off circuit has exceed the Hi/Lo limits (Code 36) and that the Exhaust is to lean (Code 44).
Whether or not this means that the sensor is bad or that the parameter it measures has truly been exceeded is yet to be determined however, you do know that the PROM based limits for these two sensors have been exceeded.
If the "Check Engine/System" light is on when the engine is running (during normal, driving operation in other words), the condition(s) are currently present; if the light is not on during normal operation, the limits were exceeded at some point in time and the event was recorded in memory but the reading has since returned to the normal operating range.
Once you have determine the error code situation, you can set about troubleshooting the problem or you can take your vehicle to a Corvette repair shop, tell the technician what you have found in the OBD system and perhaps somewhat shorten the repair time.
Remember to remove the shorting device from the connector after you have read the codes.
Clearing the Codes
To clear the codes from memory, remove the negative battery cable for a minimum of 10 seconds.
Very Important: Make absolutely certain the ignition key is turned to the off position. You run the very real risk of destroying the ECM/PCM module if you connect the battery with the ignition switch turned on.
Disconnecting the battery will clear all stored codes but it will also clear the radio button presets, clock, trip odometer, average gas mileage memory, power seat memory (if you have that option) and anything else that stores something in memory. Your ECM/PCM computer will also have to relearn your driving habits again and adjust the timing/mixture/exhaust emissions to your driving style.
Troubleshooting using the ECM Codes
The central point to keep in mind when troubleshooting the codes is there is no reason to automatically believe a sensor has failed. It is possible that a sensor itself is exhibiting a hard or a intermittent failure but it is more likely that a connector has gotten dirty, a wire has broken or some underlying problem is present and the sensor has done it's job.
For instance, a Mass Air Flow (MAF) error code is often a dirty connector at the MAF sensor as opposed to a bad sensor. Similarly, a code indicating a lean condition can be timing, fuel delivery or dirty/plugged injectors. The codes are normally a symptom, not the disease.
Do not immediately buy a new sensor in hopes that will fix the problem. Look into the problem a bit more first using the links from the code table as your guide and consider buying a scan tool so you can determine exactly what your ECM/PCM is being told by the various sensors and---just as important---how it is reacting to the sensor inputs.
The table which follows lists the error (trouble) codes which can be stored and recovered using the pin A/B technique explained above. To learn some possible causes for the codes, click on the code number.
ECM Codes
| Code | Circuit or Sensor |
| 13 | Oxygen Sensor Circuit |
| 14 | Coolant Sensor Circuit (High) |
| 15 | Coolant Sensor Circuit (Low) |
| 16 | Ignition Pblms (Used on 1992-1996 models only) |
| 21 | Throttle Position Sensor (TPS) (High) |
| 22 | Throttle Position Sensor (TPS) (Low) |
| 23 | Intake Air Temperature (Low) |
| 24 | Vehicle Speed Sensor (VSS) |
| 25 | Intake Air Temperature (High) |
| 26 | Quad Driver Module Number 1 |
| 27 | Quad Driver Module Number 2 |
| 28 | Quad Driver Module Number 3 |
| 32 | Exhaust Gas Recirculation Circuit |
| 33 | Mass Air Flow Sensor Circuit (1985-1990) |
| 33 | Manifold Absolute Pressure High (1984) |
| 34 | Mass Air Flow Circuit (1985-1990) |
| 34 | Manifold Absolute Pressure Low (1984) |
| 35 | Idle Air Control Circuit (IAC) |
| 36 | Mass Air Flow Burn Off Circuit |
| 41 | Cylinder Select Error Circuit (1985-1991) |
| 42 | Electronic Spark Timing Circuit (EST) |
| 43 | Knock Sensor Circuit |
| 44 | Lean Exhaust Present |
| 45 | Rich Exhaust Present |
| 46 | VATS Anti Theft Circuit Fault |
| 51 | PROM/EEPROM Error |
| 52 | Oil Temperature Circuit (Low Temperature) |
| 53 | System Charging Voltage High or Low |
| 54 | Fuel Pump Circuit (Low Voltage) |
| 55 | Engine Running Lean |
| 62 | Oil Temperature Circuit (High Temperature) |
| 63 | Oxygen Sensor Circuit (Open) |
| 64 | Oxygen Sensor Circuit (Lean Exhaust) |
| 65 | Oxygen Sensor Circuit (Rich Exhaust) |
| 66 | Air Conditioner Pressure Limit Exceeded |
| 67 | Air Conditioner Pressure Limit Exceeded |
| 68 | Air Conditioner Relay Fault |
| 69 | Air Conditioner Clutch Fault |
| 72 | Gear Selector Switch Fault (Start Lockout) |
Possible Failures Associated with ECM Codes
The C4 Corvette uses several computers---more in the later models than the early years--- and each has it's own set of trouble codes. The Anti-Lock Brake System (ABS) , Automatic Slip Regulation (ASR), Selective Ride System (SRS) as well as the Air Conditioner Controller, the Air Bag's computer system (called the DERM module) plus the Central Control Module (CCM) on 1990 and later C4s, all have their own computers and their own set of possible trouble codes. Some can be recovered without a scan tool, some cannot. You will need a service manual for your year C4 to discover the procedure to gain access to those codes.